Introduction
The Benefit/Cost Calculator is no longer avaiable on TIMS. Please visit Caltrans website at http://www.dot.ca.gov/hq/LocalPrograms/hsip.html for a HSIP application.
The Benefit/Cost Calculator on TIMS is an interactive tool that calculates a benefit/cost ratio for a project based on a user's chosen countermeasures and data. This B/C ratio is required on applications for Highway Safety Improvement Program (HSIP) funds from the California Department of Transportation (Caltrans). This user guide was written for users who are submitting Caltrans HSIP applications. For those who are performing their own road and safety analyses, they are not expected to follow all of Caltrans’ special requirements.
For questions related to the HSIP call for projects, available countermeasures and their attributes, or general HSIP application instructions, please refer to the Cycle 6 Call for Projects page at: http://www.dot.ca.gov/hq/LocalPrograms/HSIP/apply_now.htm.
To use this tool, click on Benefit/Cost Calculator from the Tools dropdown menu.
For questions on data and/or mapping, please check the SWITRS (Query; GIS Map) FAQs before contacting TIMS Support. If you are experiencing other technical issues in using the site, you can contact TIMS Support at tims_info@berkeley.edu. TIMS Support cannot provide guidance on the selection of countermeasures or validity of proposed projects nor can it control the timeliness and quality of crash data.
Overview
To use the Benefit/Cost Calculator, please be prepared to:
- Review and select countermeasures
- Import crash counts
- A summary table of crashes by injury severity can be used, or
- A crash file that can either be a CSV file downloaded from a TIMS application, or a Crossroads software KML file. For help selecting and downloading crashes from SWITRS GIS Map, please refer to the Selecting for HSIP Tutorials.
- Determine total project cost breakdown from the Project Cost Estimate in the HSIP Application
1. Basic Information Input
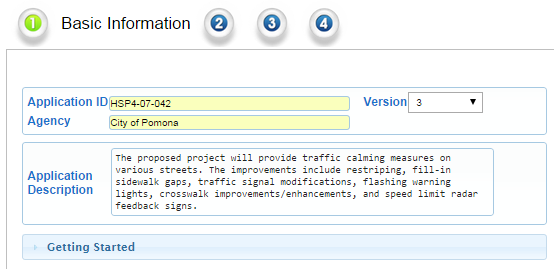
Applicaton ID
To get started, enter your Application ID; this must be the same ID that you will be using on the HSIP PDF application.
Agency
Enter your Agency's name.
Version
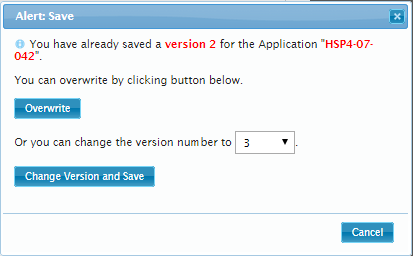
The Benefit/Cost Calculator allows different versions of an application to be saved. For your first run-through, you can leave it as Version 1. In the future, you may want to load a previously saved version of a project, make slight changes to the crash data, countermeasure(s), and/or costs, and then save it as a different version. You can save up to three different versions of a project.
Application Description
There is also space to add a short application description for your project. The description here must exactly match the wording in your HSIP PDF application.
2. Countermeasure(s) Selection
The second page is where you choose potential countermeasure(s) and the crash data that is associated with each of the countermeasure(s).
Crash Data Time Period
First, select the time period of your crash data. You can either type the dates in or select them from the pop-up calendar widget. The number of years in the selected time period will automatically be calculated and displayed to the right.
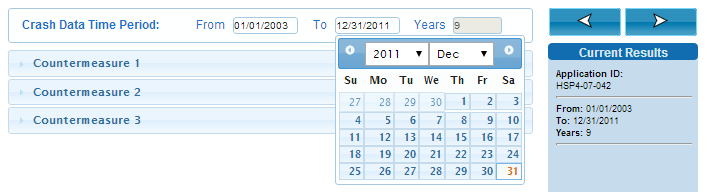
A Current Results box to the right of the screen will automatically display the Application ID, date range, and countermeasures that you have selected.
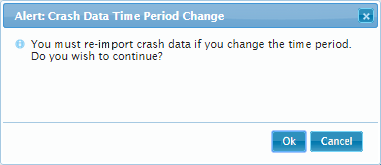 Tip: Try to select the correct time period during this step. You can change it later on, but you will then be asked to reimport crash data.
Select Countermeasure
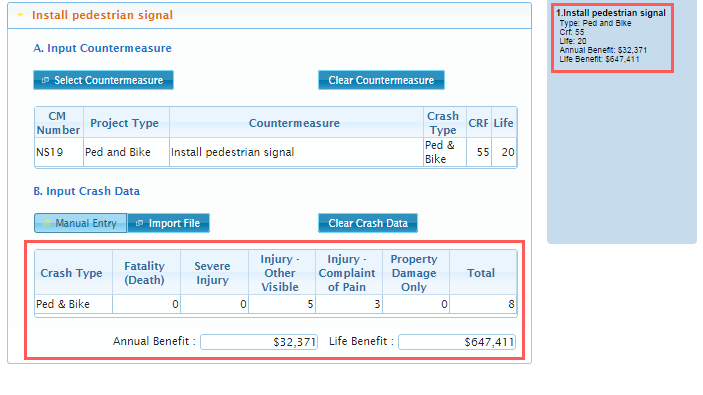
After the time period has been entered, click on Countermeasure 1 to expand the pane for more options. Select Countermeasure to open a dialogue window of all of the different countermeasure options. Countermeasures (CMs) are sorted into three different categories: Signalized, Nonsignalized, and Roadway. Click on a tab to show its relevant CMs. The table will also show you: a countermeasure's number (CM Number), Project Type, description, the type of crash it applies to (Crash Type), crash reduction factor (CRF), and the lifetime benefit (Life).
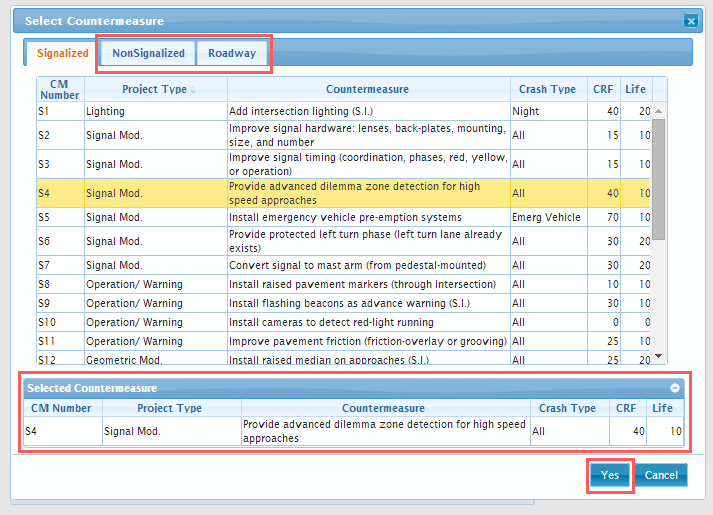
Once a CM has been selected, it will be displayed as the Selected Countermeasure at the bottom. Click Yes to finish your selection.
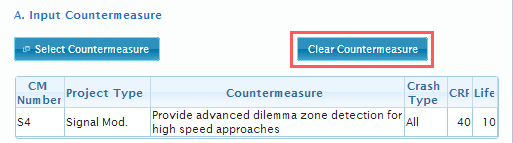
If you want to choose a different countermeasure at a later time, simply click on Select Countermeasure again and choose a different CM. You can also Clear Countermeasure to easily start over.
Input Crash Data
After a CM has been selected, you will next need to input crash data. You can either do this manually, by importing a file, or a combination of both.
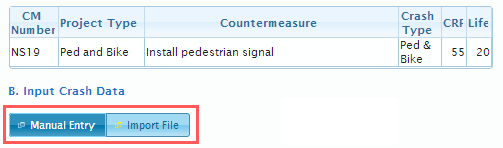
Manual Entry
Click on Manual Entry to enter your own data. Please note that this data should be the number of crashes only and not the number of injuries and/or fatalities. The Crash Type for that CM will be highlighted in green. In this example, only pedestrian and bicycle-related crashes are applicable to the Countermeasure: Install pedestrian signal. Input the number of crashes in the appropriate fields by injury severity level. The total for each crash type will be computed based on what you have put in for its respective row of data. Click OK to finish.
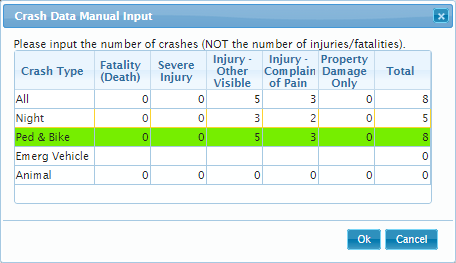
Note: Remember that you can see which Crash Type applies to a CM when you are on the Select CM dialogue window. Additionally, note that Crash Type-All is not the sum of the four other crash types.
The applicable crash type data that you have inputted will now be displayed in a similar table on the main Countermeasure(s) Selection page. Finally, based on these crashes, the annual benefit and life benefit for this CM will be calculated and populated in the Current Results window.
Import File
You can also Import File to input crash data. This function allows you to directly import crashes files that have been downloaded from the TIMS mapping tools, such as the SWITRS GIS map or SWITRS Query & Map. Choose File and then select a csv file. You can also import crashes from a Google KML file that has been exported from the Crossroads mapping software. Note that the tool will check your data and display only crashes that match the CM's crash type and the crash data time period that was entered earlier in Step 2. 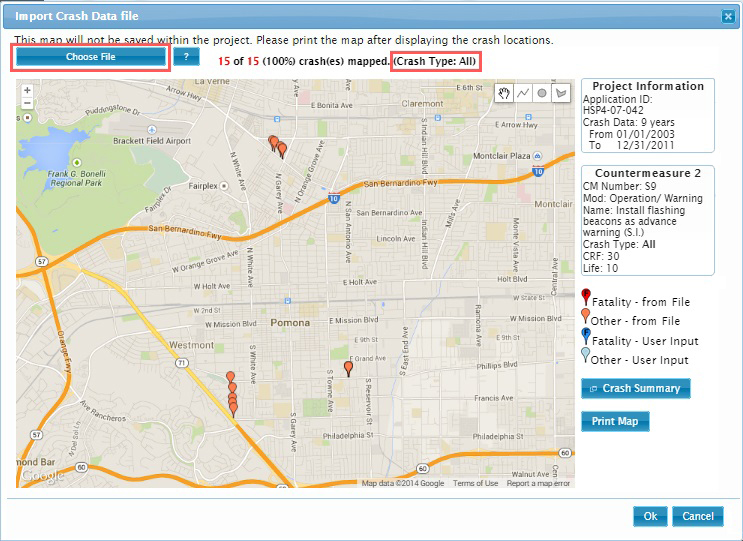
Review and verify crashes
Once a file has been imported, you can review the mapped crashes to verify that these are indeed the crashes that you are interested in.
Note: The following 2 functions only work with crash csv files that have been downloaded from the SWITRS tools or KML files downloaded from Crossroads software.
Check individual crashes
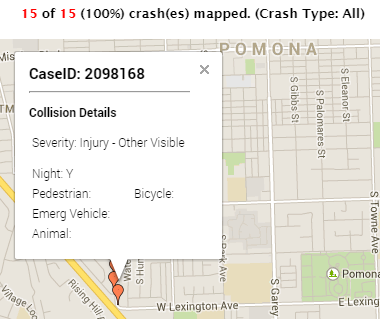 Zoom in and click on an individual crash to learn more about it. An info window will come up for that crash and detail its Case ID #, severity level, and crash type.
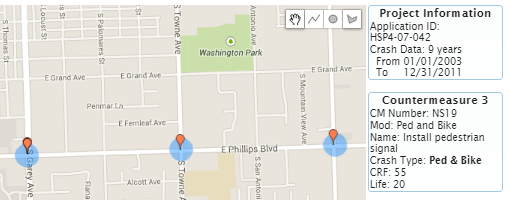
Crash Summary
 You can also review the Crash Summary of your mapped crashes to confirm that the mapped ones are what you are interested in. The applicable crashes for the selected CM are highlighted in green.
Add, Modify, and Delete Additional Crashes
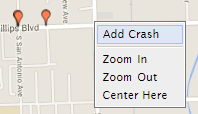 If there are additional crashes that you know of that were not included in the SWITRS database, you can add these crashes yourself. To add a crash, zoom in to its location, right-click, and then Add Crash.
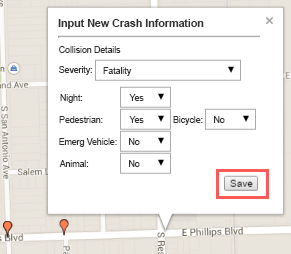 In the Input New Crash Information window, select the appropriate Severity level and then indicate Yes for the crash type(s) that the crash pertains to. Save to finish adding the crash.
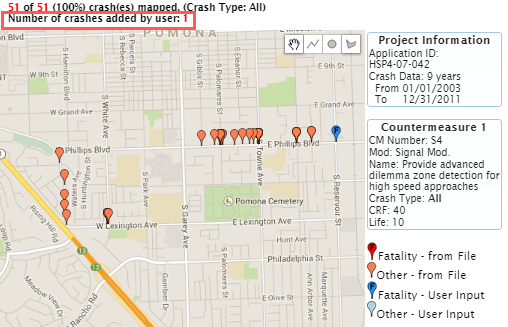
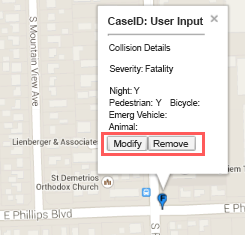 The newly added crash will be displayed with a blue icon; the shade of blue depends on if there was a fatality involved in the crash or not. On top, the tool will show how many crashes were added by the user.
Crash(es) added by user will also be automatically reflected in the crash summary.
 You can also Modify or Remove a crash after it has been added by clicking on a crash that you have added.
Note: Another way to add additional crashes after a file has been imported is to click on Manual Entry and add the crashes there. Crashes added via Manual Entry will not be mapped like the other crashes that were imported.
Measurement Tools
There may be instances where you want to measure the length of a corridor or the distance between crashes. For these scenarios, use a measurement tool.
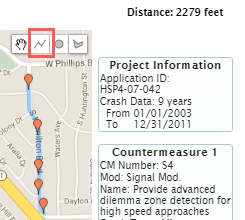 To measure distance, use the Draw a line tool. Click to start drawing on the map. If the line changes direction, click for each point where the line changes direction. Otherwise, double-click to finish drawing. The total distance will be shown on the top right of the window.
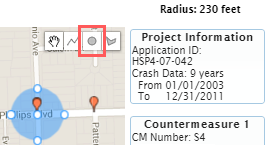 To measure the radius of a circle, use the Draw a circle tool. Click to place the center of your circle, then drag outward and release to complete the circle. The radius will be shown on the top right of the window.
- To draw multiple shapes: Re-click on a shape to draw additional ones.
- To modify a shape: Click on the shape and move one of its points elsewhere.
- To delete a shape: Right-click on the shape.
Drawing Tools
Use a drawing tool to draw attention to an area that you are interested in for your project. For example, you can draw circles to show which intersections might benefit from pedestrian countdown signals.
Print Map
When you have finished inputting (additional) crashes, measuring areas, and drawing shapes, make sure to print the map out. This crash data map will not be saved if you go back to Step 1 or continue onto Step 3 of the B/C tool; thus, if you do not print it out while in Step 2, you will have to reimport and redraw shapes if you come back to it later. You can either Print Map physically or save it as a PDF.
3. Project Cost Data
The third page is where you input the total project cost data and its breakdown by countermeasure and other costs for Caltrans' HSIP applications. The Total Project Cost value is taken from section 3 of your HSIP PDF application form and represents project development and construction costs.
When you enter the estimated percentage of total cost that each CM will require, make sure that this cost percentage split is an accurate representation of what each countermeasure will cost. For Caltrans HSIP Applications, the percentage of total cost attributed to each CM is taken from the Detailed Engineer's Estimate. The B/C Calculator then apportions the total project costs to each CM based on the percentages from the Detailed Engineer's Estimate.
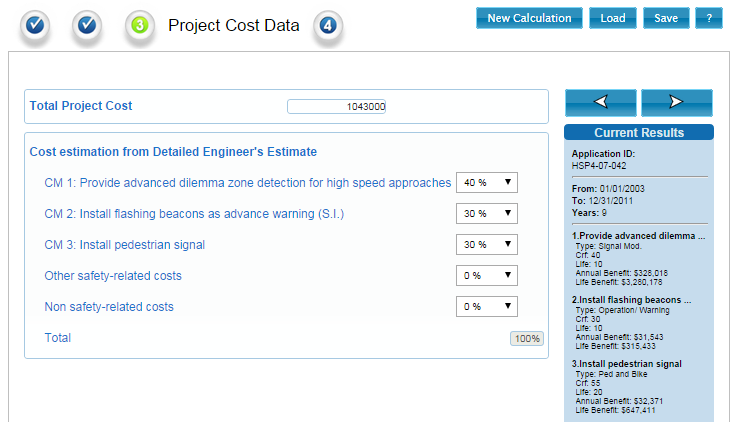
Note: If the sum of the percentages does not equal 100%, a warning will pop up and you will not be able to proceed to the final page until the percentages have been corrected.
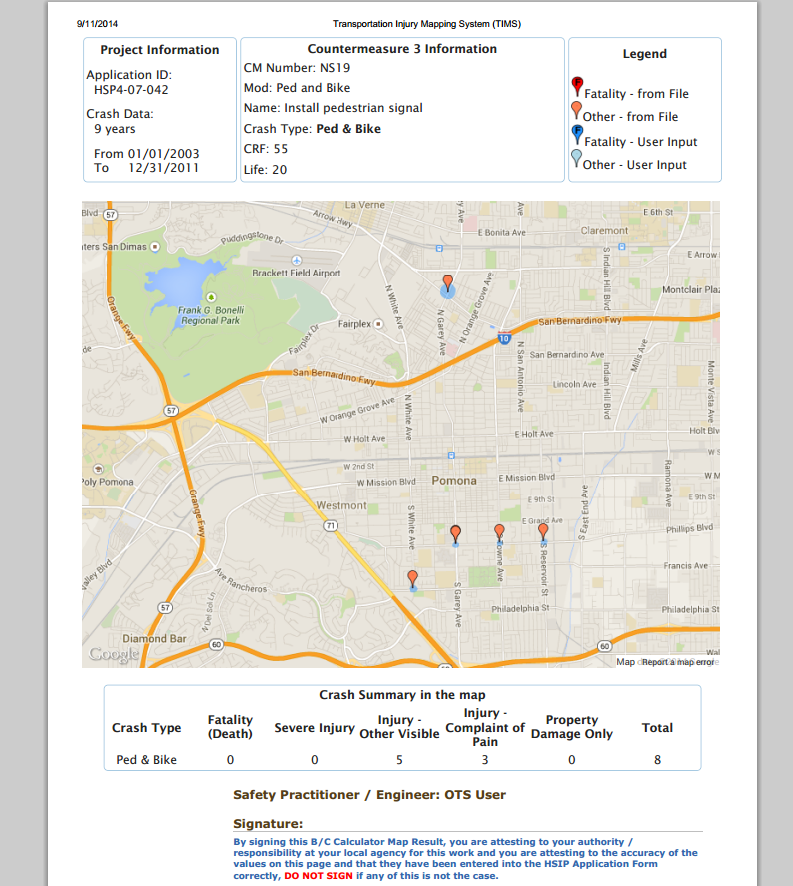
4. Results Summary
The last page of the B/C tool displays the Results Summary for the project. This includes general project information, the selected CMs and their relevant individual numbers, and the final benefit/cost result. At the bottom is the B/C Ratio, 2.16, in this example, which is the value you want for your HSIP Application.

Save as a Final Version
On the Results Summary page, click on Save as a Final Version to indicate the final version of data that was used to prepare the B/C Results Summary page that will be submitted in your HSIP Application. This helps Caltrans later easily check for matching values between its two databases.
Print Summary
Print Summary to print this entire page or save as a PDF. You will be prompted with the option to include your name on the summary page as the Safety Practitioner/Engineer. At the bottom of the page is a place for you to sign to attest to the accuracy of the values on this page and that they have been entered into the HSIP Application Form correctly. Once the form is signed, include a copy with your application.
Calculation Options

New Calculation
Click on New Calculation to start a new project or calculation in the B/C tool.
Load a Saved Project
To load a previously-saved project, click on Load. This will then take you to a page of your projects and their different versions. Click on a project to highlight and select it, then click on Load.

Note: The green check for version 3 of the Pomona project indicates that this version was the one that was submitted as the final HSIP Application to Caltrans.
Save Project
You can Save your progress at any point within the tool. Click on Save to open the Alert: Save dialogue window. If you have previously saved the same version of a project, you will be asked if you want to Overwrite the current version, or save it as a different version.